How to Sync Audio and Video in Premiere: Sync Like a Pro

You shot a great interview. The lighting is solid, the framing is perfect, the audio sounds clean. But when you bring it into Premiere, the voice feels slightly off. Even a half-second delay can make the entire edit fall flat. It breaks the flow and takes away from the quality of your work.
This happens often when audio and video are recorded separately. Maybe you used a DSLR with a Zoom recorder. Maybe it was a two-camera setup with a lav mic. Even with careful planning, sync can slip. Fixing it after the fact wastes hours and adds stress to your timeline.
Knowing how to sync audio and video properly inside Adobe Premiere Pro is not just a nice skill. It is essential if you want your edits to meet professional standards in handling multiple audio clips and on-camera audio. Whether you are working on an interview, a live event, or a short film with reference audio, clean sync gives your project polish and flow. Get this right, and everything else becomes easier.
Why Syncing Matters: Common Causes of Desync
Before diving into how to sync audio and video in Premiere, it helps to know why audio and video go out of sync in the first place. Most of the time, the issue starts right at the shoot. One of the most common causes is using an external audio recorder. These devices often do not share an audio timecode with your camera, so they capture audio independently, making post-sync a must.
Frame rate mismatches can also be a problem. If your audio was recorded at 48 kHz but the video timeline is set to something different, it can create a slight delay or drift over time. This is especially noticeable in longer takes.
Other culprits include dropped frames during import, camera audio being muted or corrupted, and project settings that do not match the original footage. Some cameras even record without any usable audio, leaving you with clean visuals but no anchor for syncing.
Trying to fix all of this at the end of your edit is a recipe for wasted hours. That is why it is smarter to sync everything right after importing. Whether you are working on a YouTube vlog or a short film, getting the audio locked early will keep your timeline and your head much clearer.
Method 1 – Merge Clips in Project Panel
Merge Clips is Premiere Pro’s built-in tool designed for syncing separately recorded audio and video. It is convenient when you have a single camera and one or more external audio files.
Here is how to do it:
1. In the Project Panel, select your video clip.
2. Hold Shift (or Command on Mac) and click to select one or more audio-only clips. You can merge up to 16 audio tracks with a single video file.
3. Right-click and choose Merge Clips, or go to the Clip menu and select Merge Clips.
The Merge Clips dialog box will pop up. Choose how you want Premiere to sync the clips:
· In Point: Useful if you use a clapperboard or clap at the beginning.
· Out Point: Good for end-of-scene claps or slates.
· Timecode: It is best if your camera and recorder both support synced timecode.
· Clip Marker: Works if you've placed numbered markers ahead of time.
Once done, a new merged clip will appear in your Project Panel with “– Merged” in the name. You can rename it as needed.
This method is excellent for single-camera setups with external mics, a standard in talking head videos, interviews, or narrative shoots with audio clip files.
Limitations to Watch Out For in Merge Clips:
· Once merged, the sync can not be changed under the automated process. If it's off, you will need to create a new merged clip under a new sequence.
· Merged clips do not work well with XML or AAF exports, so be cautious if you are passing the project folder to another editor or app that is not using the latest version for regular clip processing.
· Gaps in component clips can create issues when dragging into the timeline. You might get warnings like “Invalid edit” in the other clip or the merged file if an In or Out point falls in an empty section of audio or video.
Pro Tip: Always preview merged clips before cutting them into your timeline. It is faster to catch issues now than mid-edit using automated features.
Method 2 – Synchronize Clips on Timeline
The Synchronize tool is a quick way to line up clips directly on your timeline when learning how to sync audio in Premiere. Unlike Merge Clips, this method lets you visually confirm the sync before committing to a reference track or scratch track.
Here is how to use it:
1. Drag your audio and video clips onto the timeline. Stack them in separate tracks.
2. Select all the clips you want to sync. This could be one video and one audio clip or multiple sources.
3. Right-click and choose Synchronize, or go to the Clip menu and select Synchronize.
You will get a dialog box with several sync options:
· Clip Start or Clip End: Aligns clips to the beginning or end.
· Timecode: Works well if all clips share a standard timecode.
· Clip Marker: Ideal if you have placed a marker at a visual/audio sync point, like a clap or cue.
Once you hit OK, Premiere will shift the clips to match the selected sync point. If the audio and video have a clean waveform match—like a clap or spoken word—it usually does a solid job.
This method gives you more control and flexibility than Merge Clips. You can immediately check if things look right and nudge them if needed. Plus, it does not overwrite anything in the Project Panel while synchronizing audio.
Pro Tip: Turn on audio waveforms in the timeline to better see where sync should happen. You can always add a Marker (M key) to set a manual synchronization reference point.
Advanced Sync – LTC (Linear Timecode)
If you are using pro gear that embeds timecode in audio, Premiere supports Linear Timecode sync, too.
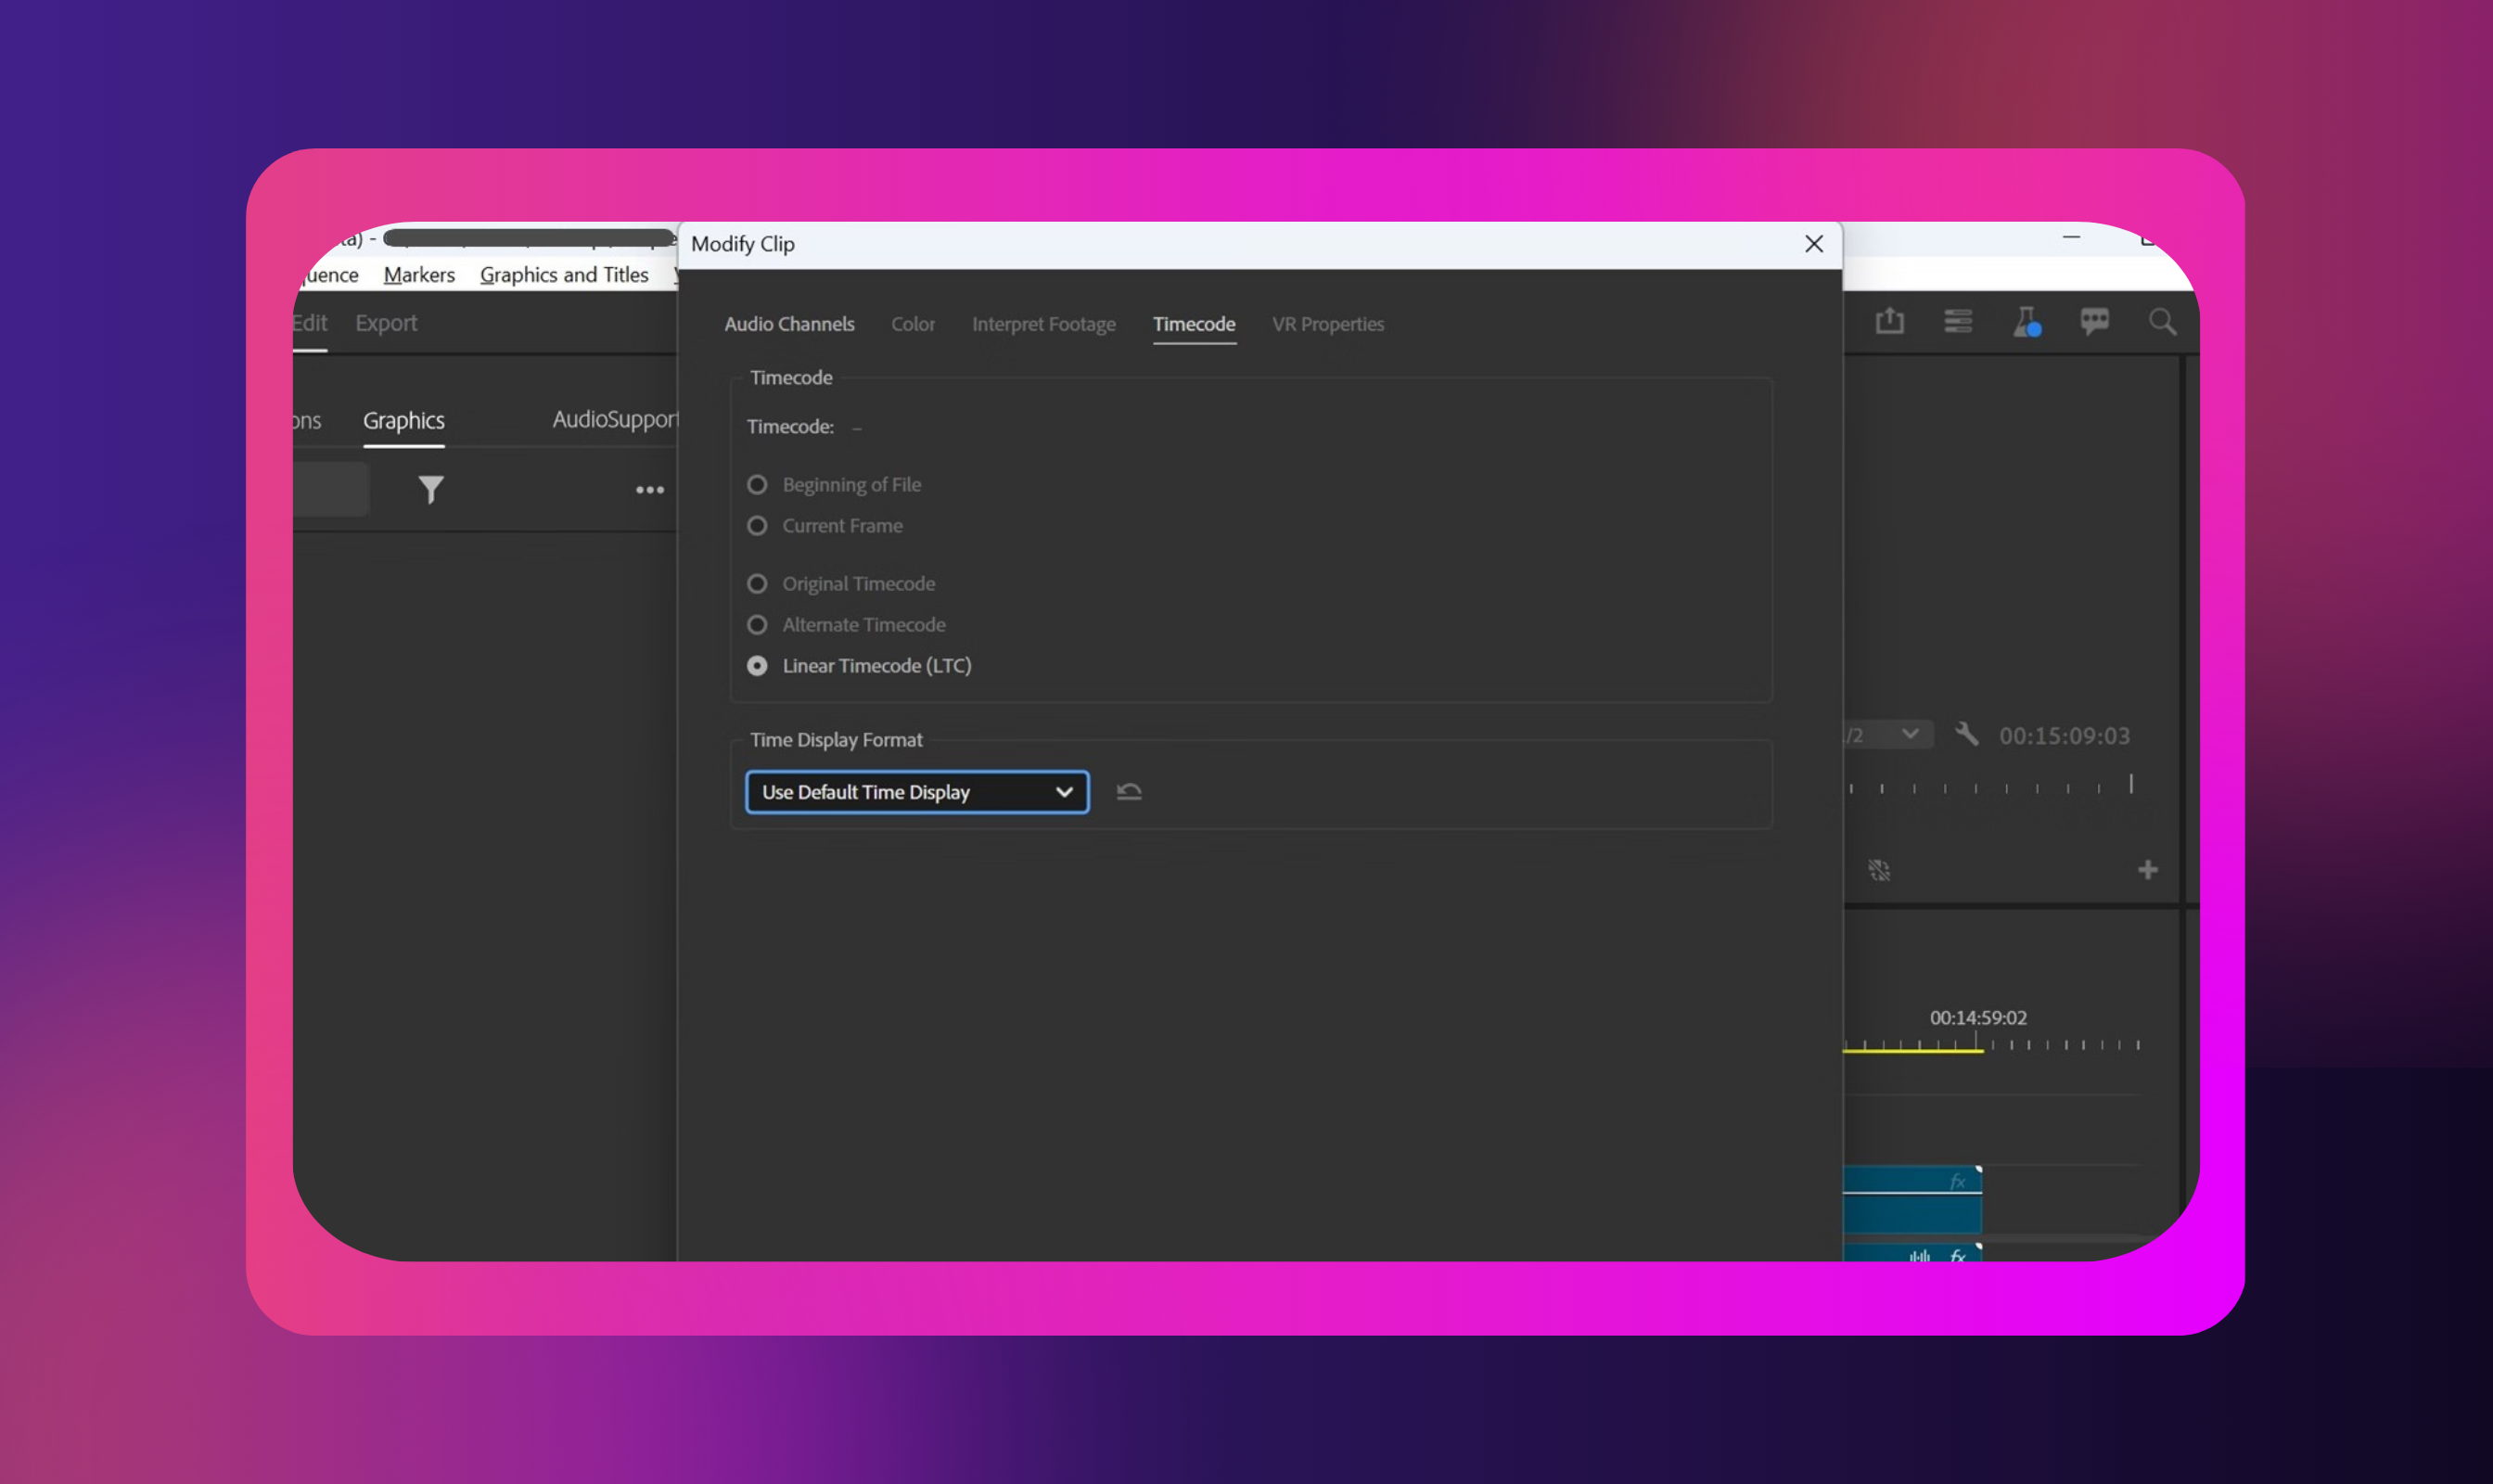
· Go to Clip > Modify > Timecode
· Choose Linear Timecode (LTC)
· Then proceed with the Synchronize tool as above
This method is often used in multi-cam shoots or documentary-style setups where recorders and cameras run independently.
Method 3 – Multi-Cam or Source Sequence Syncing
Multi-cam editing in Premiere Pro lets you switch between multiple camera angles and audio sources in a single timeline. It is the go-to method for interviews, live events, panel discussions, and music performances where several cameras are rolling simultaneously and audio is recorded separately.
Here is how to set it up:
1. In the Project Panel, select all your camera angles and external audio files.
2. Right-click and choose Create Multi-Camera Source Sequence.
3. In the dialog box, choose your sync method. Audio is usually the simplest—Premiere analyzes waveforms and lines them up automatically. You can also use Timecode, In/Out points, or Clip Markers if available.
Once the sequence is created, you can:
· Drag it into a timeline
· Right-click the track and select Enable Multi-Camera Editing
· Open the Program Monitor and click the wrench icon to switch to Multi-Camera View
From here, you can "cut" between angles in real time by clicking the active camera on the monitor or using keyboard shortcuts.
Pro Tips:
- Rename your camera angles clearly (Cam A, Cam B, etc.) to avoid confusion
- Use proxies for high-resolution footage if playback lags
- Always double-check the audio source Premiere is using in the Multi-Cam clip
In longer recordings, audio may drift slightly even after syncing separate video clips. If you notice the timing slipping, break the sequence into shorter sections and re-sync clips manually if needed.
Multi-Cam is a powerful time-saver, especially once you get the hang of it. It is one of those features that feels clunky at first but becomes second nature with practice in handling video and audio clips.
Manual Sync: When Automation Fails
There are times when automated tools just can’t save the day, like when audio is distorted, missing, or completely off. That is when manual syncing comes in handy when learning how to sync audio and video in Premiere.
Start by looking for a clear visual cue in your footage, something like a clap, a flash, or the moment someone begins speaking. Then:
1. Scrub through your video track until you find the cue.
2. Zoom into your audio waveform to find the matching audio spike.
3. Use the Alt + left/right arrow keys to nudge the audio until it lines up perfectly.
4. Use the M key to drop markers on both clips for reference points.
Pro Tips:
· Turn snapping off (press S) to move clips freely
· Mute the scratch audio from the camera once you are done, so it does not clash with the cleaner track.
· Use multiple layers if needed and nest your final sync for easier editing
Use Murf When You Have No Usable Audio

If your footage has no clean audio, maybe the mic failed, or background noise ruined the take, text to speech and AI dubbing tools like Murf can help. It offers over 300 AI-generated voices in 35+ languages, with options for different tones like calm, conversational, or promotional. Once your voiceover is in place, you can fade audio in Premiere to create smoother transitions between dialogue, music, and ambient sound.
You can adjust pitch, pacing, and pauses to match your footage and generate studio-quality voiceovers without needing to re-record anything. It is an excellent option for explainer videos, training content, or interviews where only the video was correctly captured. Just script the dialogue, generate it in Murf, and drop it right into your Premiere timeline. Quick fix, no reshoots needed.
Advanced Tips & Workflow Tweaks
Syncing clips is just the first step. Staying organized is what keeps your edit on track, especially in longer projects or team environments, while trying to fix double audio in Premiere Pro.
Here are a few habits that help:
- Label synced clips: Rename them clearly or color-code by camera and audio type
- Nest sequences: If you have manually synced or combined multiple sources, nest them before applying cuts or effects
- Keep original audio tracks: Even if you mute them, having backups can save you later
- Use markers generously: Mark key sync points, the start of interviews, or any spot you might need to reference again
- Apply sync before effects: Once you add effects, transitions, or cuts, re-syncing becomes trickier
- Export proxies: For 4K or RAW footage, proxies keep editing smoothly without touching your original files
Small steps like these keep your post-production efficient, especially when deadlines are tight and footage piles up fast.
Final Take: Sync Early, Edit Smarter
Syncing audio and video in Premiere is one of those skills that quietly saves your project. Whether you are merging clips, aligning waveforms, switching angles in Multi-Cam, or doing it all by hand, including manual audio dubbing, knowing your options gives you real flexibility.
Each method serves a different need, and the best editors know when to use which one. The trick is not just learning the tools, but building the habit of syncing early. That single step can save hours later.
Before you dive into cutting and color, take a moment to lock the audio in place. Try different methods on test footage. Get comfortable nudging, syncing, nesting. After a while, syncing won't slow you down; it will just be part of the process. Happy syncing!

Frequently Asked Questions
How do I sync audio and video when the camera has no audio?
.svg)
If your camera recorded video without any usable audio, look for clear visual cues like a hand clap or lip movement to line up external audio at a synchronization point in the new project to get the right final product.
Why is the Synchronize option grayed out?
The Synchronize option stays disabled if only one clip is selected or if the selected clips are not compatible under the video in Premiere Pro. Make sure you have chosen both a video clip and at least one audio-only clip in the timeline or Project Panel while learning how to link audio and video in Premiere Pro.
Can Premiere sync more than one audio track?
Yes, the Merge Clips feature supports up to 16 audio tracks in the Premiere Pro sync audio function. You can sync multiple audio tracks of mono, stereo, or 5.1 surround audio with a single AV clip.
How do you fix sync drift in long recordings?
Sync drift usually happens with video and audio clips in long takes when devices record at slightly different speeds. The fix is to break the footage into smaller chunks and manually sync video and audio in Premiere Pro.

.webp)
.webp)

.webp)