How to Fade Audio in Premiere: Easy Steps to Fade Out Instantly

A stunning video can fall flat if it has choppy music or jarring sounds. Sudden music cuts or abrupt dialogue endings can distract viewers and reduce the overall impact of your work. How to fix it? Smooth audio fades. Whether you are adding music, softening background noise, or blending voiceovers, fading audio in Premiere Pro is a simple trick that makes your video sound clean, modern, and professional all along.
Fading audio does more than just fix rough edits. It helps maintain a steady flow, softens background noise, and blends music or voiceovers so the audio feels natural and professional throughout the video. Even small adjustments to sound levels can make a noticeable difference to how viewers experience the final project.
This guide explains how to fade out audio in Premiere Pro in a straightforward, beginner-friendly way. It covers built-in transitions as well as quick manual methods for precise control. By following these steps, you can make your videos sound clean and well-balanced, without spending unnecessary time on complex edits.
What is Audio Fading in Premiere Pro?

Gradually raising or lowering the volume is known as audio fading. In Premiere Pro, a fade-in brings audio up from silence, while a fade-out lowers it to zero. These soft transitions prevent harsh starts or stops and make your video sound more polished.
Think of audio fades like video dissolves. Instead of jarring cuts, they create a smooth, natural flow for music, voiceovers, ambient sound, or dialogue.
Fade in vs Fade out vs Crossfade: What to Use?
When learning how to fade audio in premiere, it is important to understand the key differences between the three basic methods:
- Type
- Feature
- When to Use
Fade‑in
Gradually increases the audio volume from silence to full level.
Use at the start of a music track or voiceover to avoid a jarring beginning. Ideal for setting the tone or easing the viewer into a scene.
Fade‑out
Gradually decreases the audio volume until it fades to silence.
Use at the end of a clip, voiceover or a song to prevent abrupt audio endings. Great for closing scenes or transitions that lead into silence or a new mood.
Crossfade
Smoothly blends the end of one audio clip with the beginning of another for transition.
Use when transitioning between two music tracks or dialogue segments. Perfect for interviews, conversations, or scenes that flow into one another.
Pro Tip: Use crossfades if you need a good connection between overlapping audio elements and fade-ins and fade-outs to polish standalone clips.
How to Fade Audio in Premiere: 3 Methods to Fade Audio in Premiere Pro
Here are three easy ways to fade audio in Premiere Pro, each with its own use. Let’s break down each method:
Using Visual Fade Handles
This is the quickest and easiest way to fade audio as it does not include complex menus or effects. Just click and drag using these steps:
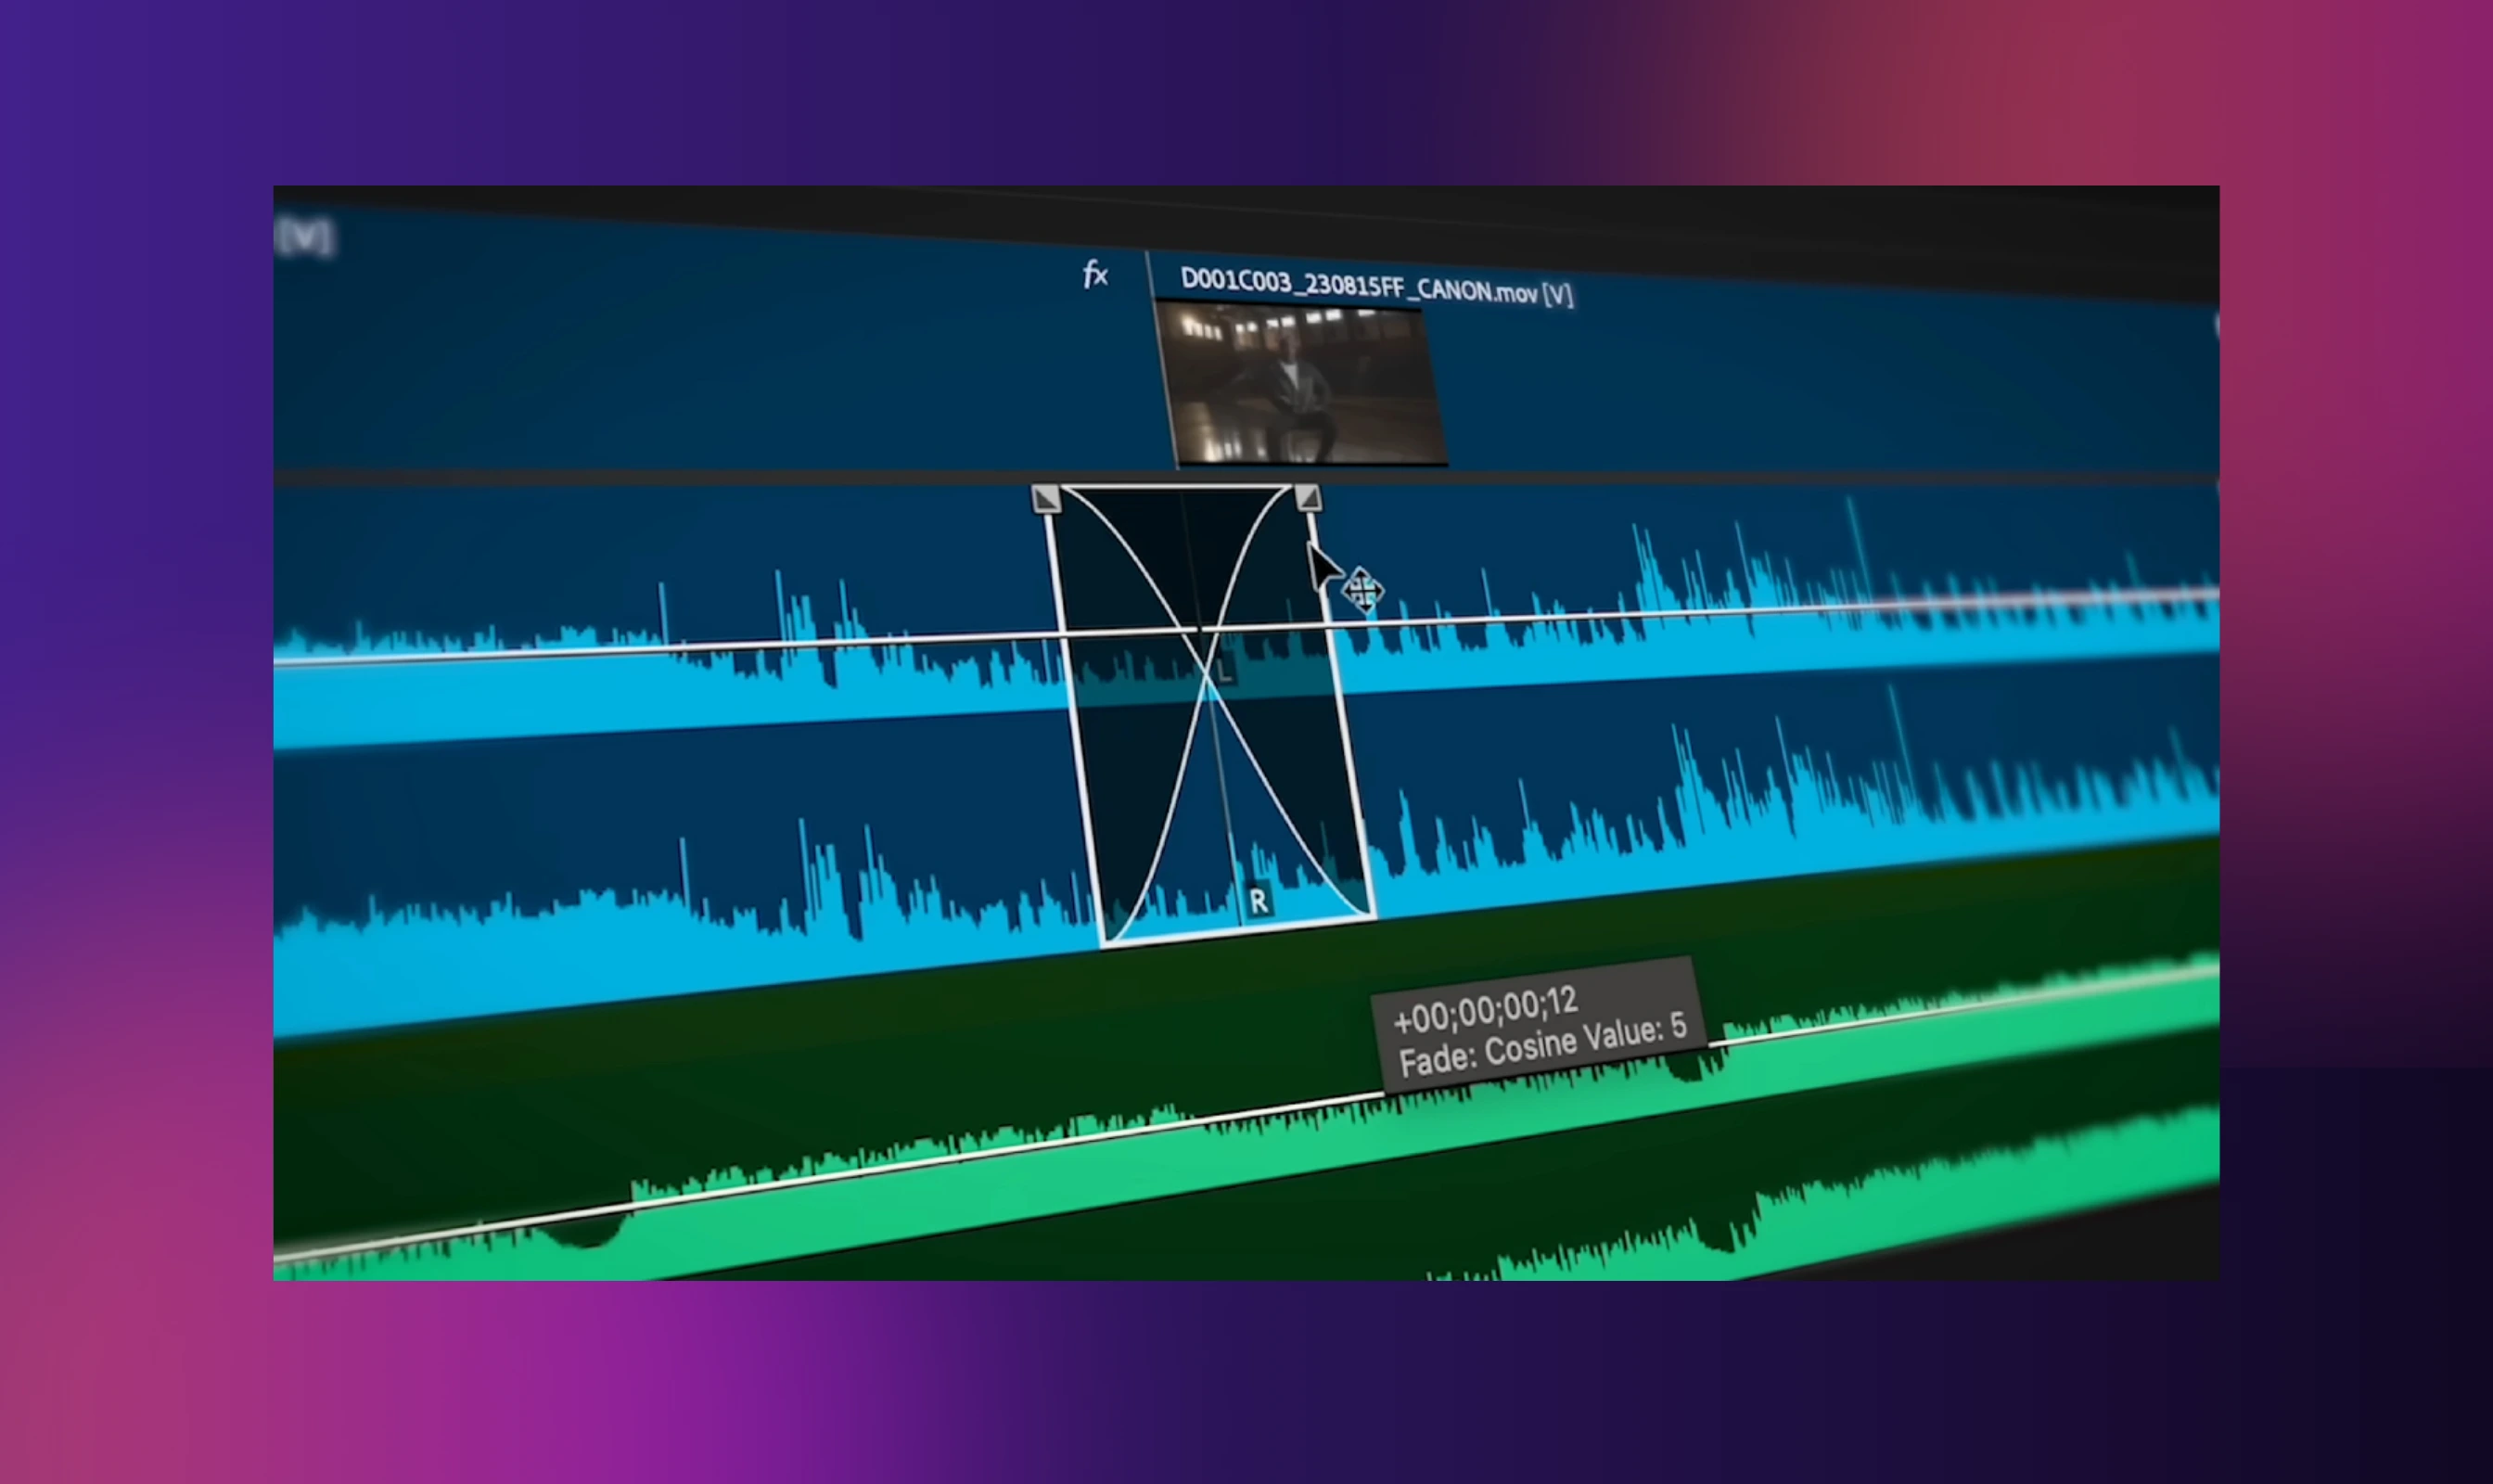
- Zoom in your audio track to clearly see the waveform.
- In your timeline. check the top-left/top-right corner of the audio clip.
- A small white handle will appear when you hover near the edge.
- Drag the handle inward to create a fade-in (start) or fade-out (end).
- If you want more control, hold Shift to move just one side of a crossfade without affecting the other or hold Option (Mac) or Alt (Windows) to change the shape or speed of the fade.
This option is best for quick fades on music, sound effects, or ambient audio as it is easy and visual in nature. However, if you need to blend two audio clips smoothly, the next method is for you.
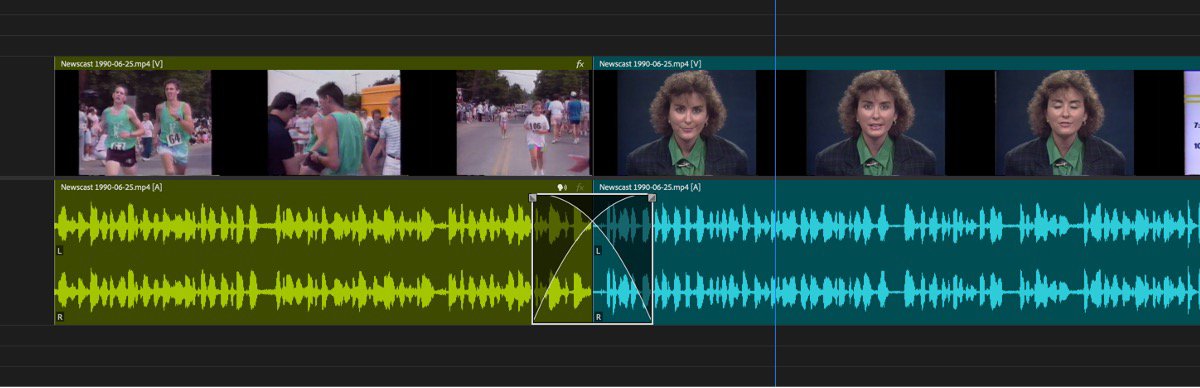
Audio Transitions → Crossfades
Crossfades help you create clean audio transitions between clips.
To find crossfades:
- Open the Effects panel.
- Go to Audio Transitions > Crossfade
- You will see three types:
- Constant Gain: Best for quick transitions.
- Constant Power: Default, natural-sounding option.
- Exponential Fade: Great for dramatic or subtle fade-outs.
To apply the crossfade:
- To fade in or out, drag the chosen transition to the start or end of a single audio clip.
- To crossfade between two clips, drop the transition at the point where the clips touch.
For fade fine-tuning:
- Select the transition and open the Effect Controls panel.
- Adjust the duration, placement, or fade curve to match your scene.
Pro Tip: Right-click on 'Constant Power' and choose 'Set as Default Transition' for quick use. To change how long fades last by default, go to Preferences > Timeline and adjust the duration setting.
For moments that need more detailed audio control like adjusting music under dialogue, keyframe automation lets you fine-tune volume changes exactly where and how you need them.
Keyframe Automation (Effect Controls)
If you want full control over your audio, especially for voiceovers or balancing music under dialogue, keyframes are your answer.
.webp)
How it works:
- Select your audio clip. Go to 'Effect Controls'.
- Go to 'Volume', click the stopwatch icon to turn on keyframes.
- Click 'Add Keyframe' and move along the timeline.
- Drag the volume line up or down between keyframes to fade the audio in or out.
Scenario: If you have background music and a person starts talking, use keyframes to lower the music during the speech, then raise it again afterward. This keeps the dialogue clear while the music subtly plays on the backdrop.
Keyframes take a bit more time but give you precise control. Once you are comfortable with keyframes, try using shortcuts and speed tips to work efficiently.
Bonus: Shortcuts and Speed Tips
If you want to speed up your audio fading workflow, these quick shortcuts and settings will help you:
- Expand all audio tracks: Press Shift +`(key above Tab) to see all track layers and access fade handles easily.
- Apply fade instantly: Select your clip(s) and press Cmd + D (Mac) or Ctrl + D (Windows) to add the default audio transition.
- Set your go-to fade: Right-click Constant Power in the Effects panel and choose Set as Default Transition.
- Adjust default fade time: Go to Preferences > Timeline and change the Audio Transition Default Duration to match your editing style.
These tips can save you time when working on multi-clip edits that need fade out audio in Premiere. Once you’ve mastered the basics, it’s important to know how different fade curves affect the sound and which one suits your needs.
Choosing the Right Fade Curve
Not all fades sound the same. The shape of the fade curve affects how natural or noticeable the transition feels. Premiere Pro's options include:
- Linear: Creates an even fade over time. Volume changes at a constant rate.
- Exponential: Starts slow and ends fast, or vice versa. Ideal for a smoother ramp in or out.
- Logarithmic: Produces a gentle, subtle transition, best for ambient or background elements.
If you are learning how to fade out audio in Premiere, and want more control over the feel of your fade, try adjusting the curve manually. Hold Option (Mac) or Alt (Windows) while dragging the fade handle to fine-tune the speed and shape of the fade. That said, it's just as important to know when to use each method for the best results.
When to Use Each Method
When working with the Premiere Pro fade out audio options, the type of fade curve you choose can really shape how your audio feels:
- Linear Fade: It is best for short clips, simple effects, or when you want a steady drop in volume. You can also use it when you need a basic, no-frills fade out audio in Premiere.
- Exponential Fade: It is best for music or ambient sounds that need a natural, soft fade-out. It is also great for creating smooth endings that feel more lifelike in your project.
- Logarithmic Fade: It is best suited for dialogues or audio dubbing where you want a quick drop that tapers off gently. It is also ideal when fading out speech or sharp sounds without sounding too sudden.
Choosing the correct curve helps make your fade out audio in Premiere feel more professional.

If you are working with voiceovers, text-to-speech and AI dubbing tools like Murf AI make your job easier. It offers over 200 voices in 35+ languages, all with natural pacing, clear pronunciation, and a balanced tone. These audio files are already levelled, so you can skip manual fades and drop them right into Premiere. Click here to get started.
Summing up
Smooth audio fades may seem like a small detail, but they make a big difference in how polished your final video feels. Whether it’s a gentle fade-in that sets the mood or a clean crossfade that bridges scenes, these transitions are essential when you sync audio and video in Premiere for a seamless viewing experience.
With 94% of content creators saying music is key to their content’s success and 91% now using AI tools in their creative process, high-quality sound editing is no longer optional.
You have got three go-to ways to fade out audio in Premiere: fade handles for quick edits, audio transitions for smooth clip-to-clip flow and keyframes for total control over volume and timing. Mastering these techniques helps you sync audio and video in Premiere with professional clarity.

Frequently Asked Questions
How do I add fade-in or fade-out to multiple clips fast?
.svg)
Select all the audio clips in your timeline to fade audio in Premiere Pro, then press Cmd + D on Mac or Ctrl + D on Windows. This applies the default audio transition to all selected clips at once, saving time when working with multiple sound effects, music tracks, or dialogue sections in your project.
Why can't I see fade handles?
Fade handles only appear if the audio track is expanded in the timeline for audio fade out in Premiere Pro. Increase track height to view the waveform clearly. If the clip is nested, grouped, or not fully rendered, handles may be hidden, try ungrouping or rendering. If you hear an overlapping sound, you may need to fix double audio in Premiere Pro by checking for duplicated audio layers in the timeline.
Which fade is best for music versus dialogue?
Opt for Constant Power crossfade for smooth music transitions between clips. For dialogues, the Constant Gain crossfade often works better, as it creates a natural volume rise between clips, ideal for scene changes or adjusting background sound under speech in a Premiere Pro fade out audio edit.
Can I customize the fade curve shape?
Yes you can. Hold Option (Mac) or Alt (Windows) while dragging the fade handle to manually adjust the curve and transition speed. For more control, use the Effect Controls panel to fine-tune fades with volume keyframes and adjust default transition duration in Premiere.
How do I set the default fade type and duration?
When handling transitions in Premiere in the Effects panel, right-click on Constant Power and choose Set as Default Transition. Then open Preferences and go to the Timeline section. There, you can change the default audio transition duration by setting the number of frames you want for each automatic fade in Adobe Premiere Pro.


.webp)
.webp)


.webp)