How to add voice over to Google Slides

Google slides are a great way to collaborate with your colleagues and share your presentations with a larger audience as they do not need to have any specific software to view it. For many of you, if you are using google slides to communicate your ideas or plans remotely, you probably want to add a narration so that you can share your thoughts on each slide in more detail with your audience.
While there is no direct way for users to record a narrated presentation in Google Slides, you can check out the following steps to add voice over in Google Slides.
Option 1 - Create voice overs for Google Slides in minutes
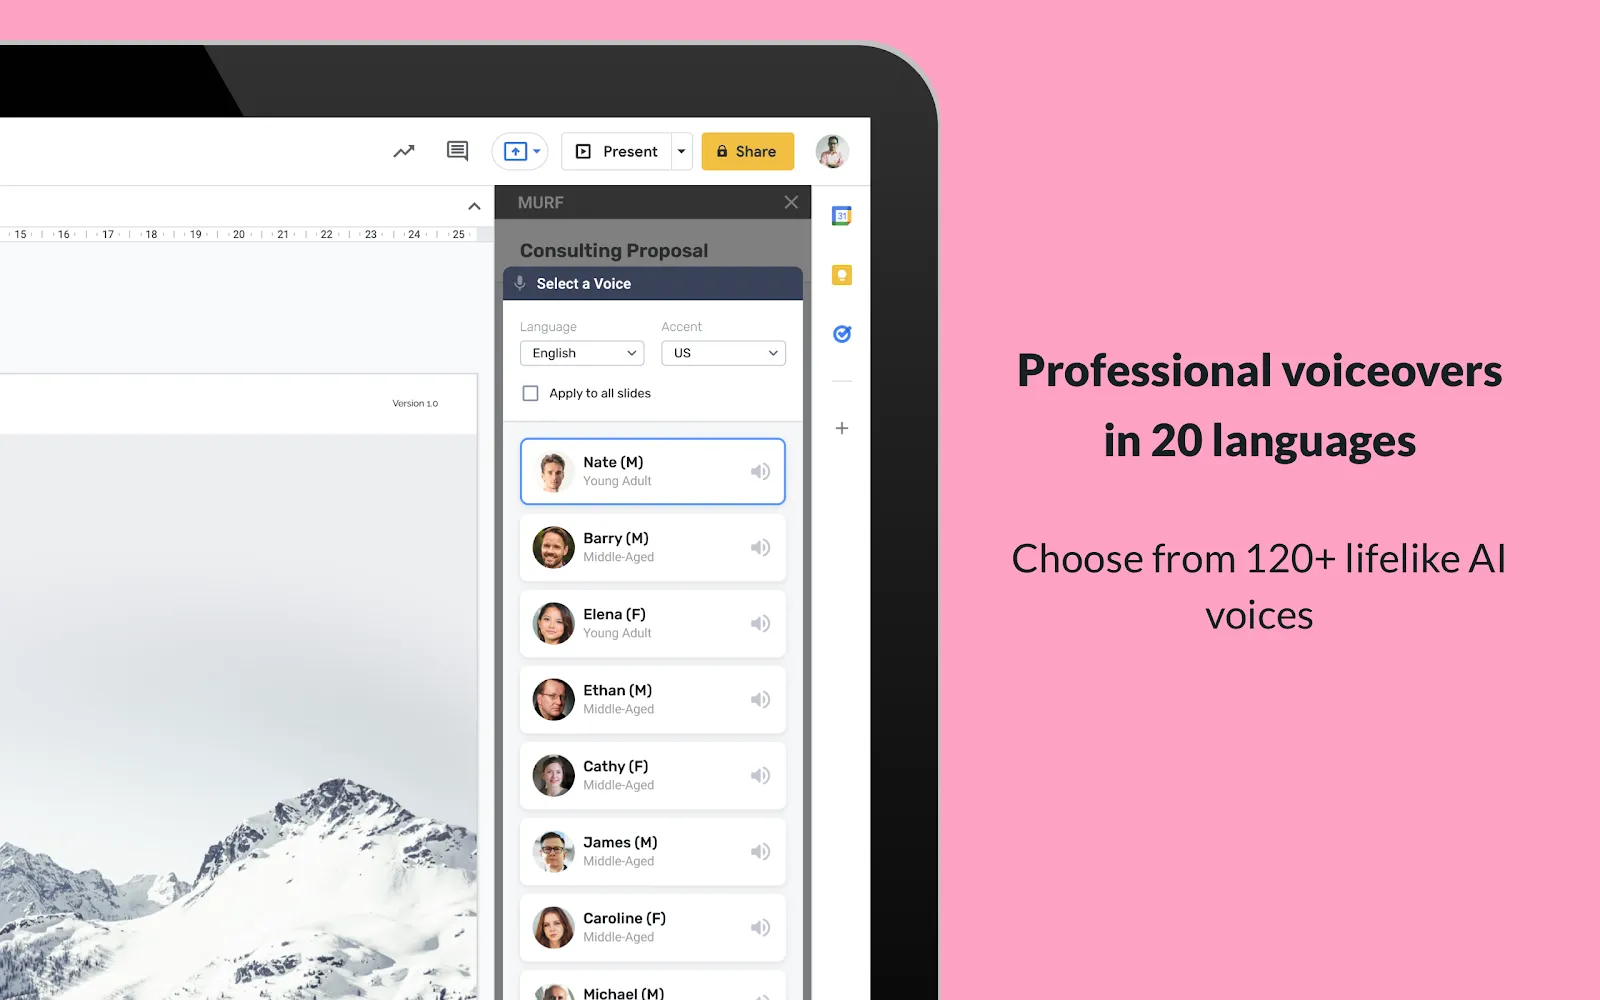
The first approach is to use the Murf Voice Over Google Slide Add on to human-like AI generated voice to your Google Slide presentation directly within Google Slides. There is no recording or post processing required, so it is super quick and easy. There are a lot of voice and narration options to choose from, and post-edits can be done in seconds as there is no need to re-record.
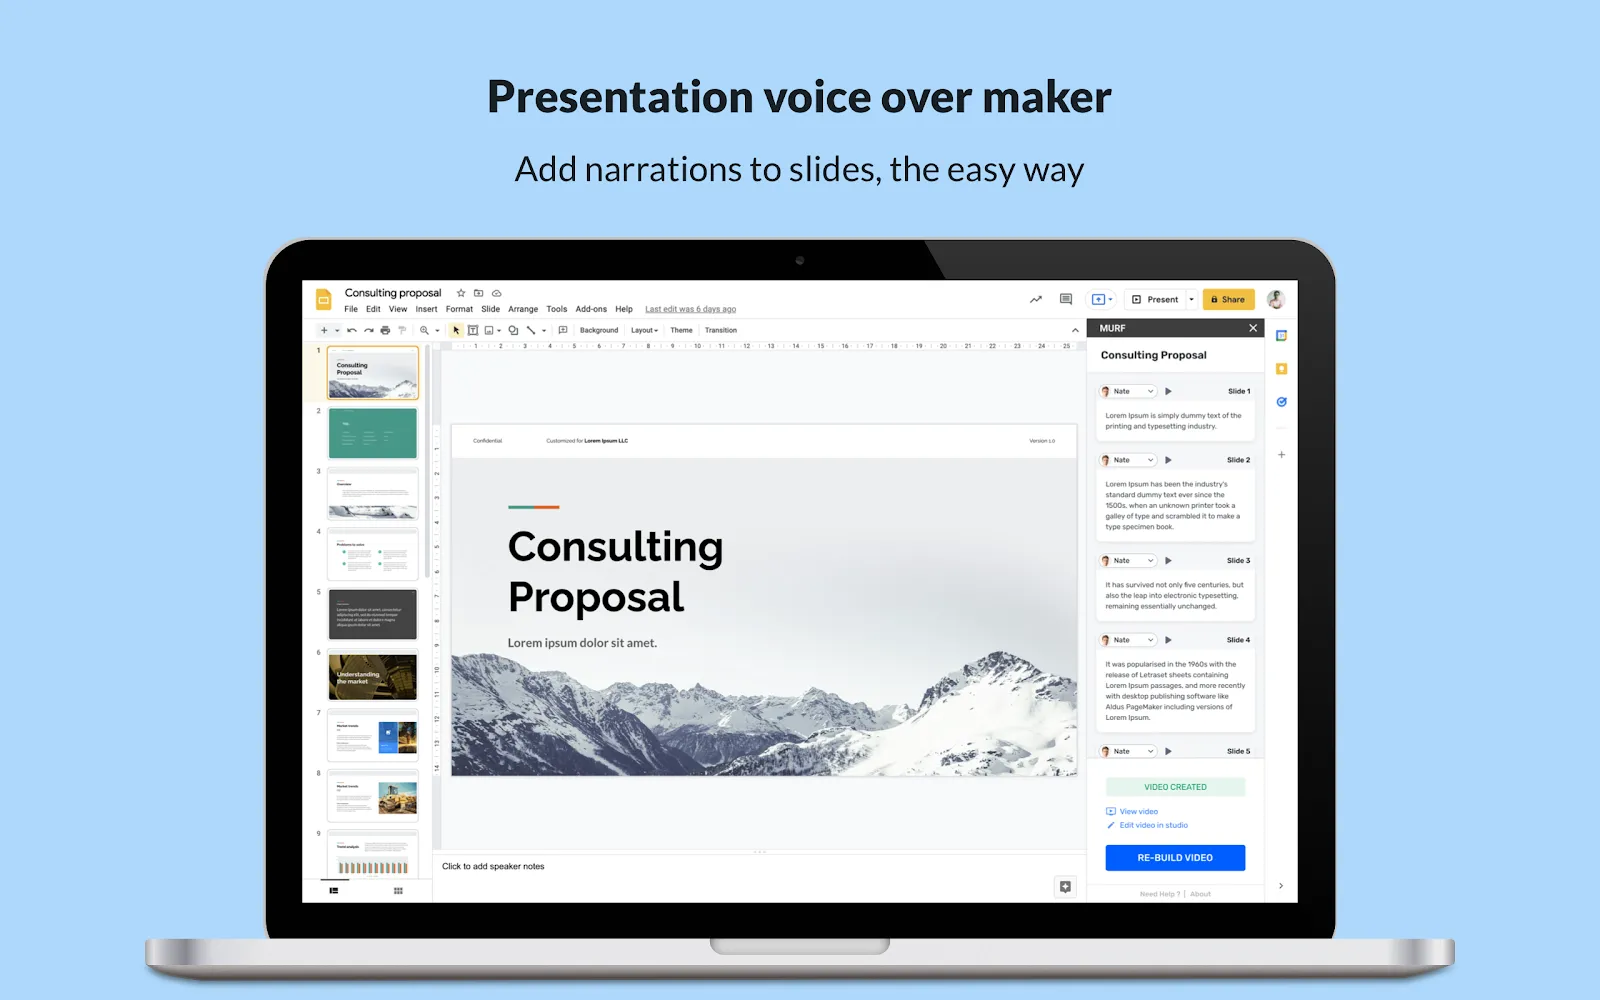
It takes only 5 steps and under 10 minutes to get this done.
To follow this easy and quick method, click on the link below for more details on the Murf Google Slide Addon:
How to add voice to Google Slides
However, if you are particular about recording the voice over in your own voice, Option 2 is the way to go.
Option 2 - Add pre-recorded narration to your Google Slide presentation
This is approximately a 10 step process and takes about 1 - 2 hours to do this for a regular sized presentation. There are two major differences in the voice over process of Google Slides and PowerPoint:
- Unlike PowerPoint, Google Slides does not give you an in-built option to record voice or slide timing, so you need to do this separately
- You will have to create a separate audio file for every single slide in Google Slides, and attach them one by one from the drive.
It takes much longer than PowerPoint because it involves a couple of additional steps. You need to record your narration in a separate recording tool, create an audio file for each slide, upload all the audio files to google drive and then insert each audio file to each slide. As you can guess already, it is a slightly cumbersome process. This makes the first Option a much simpler and faster solution.
A Step-by-Step Tutorial to add voice overs to Google Slide presentation
Here is a methodical approach that you can use if you want to narrate the Google Slide presentation in your own voice and share it with others as a Google Slide presentation.
Adding voice overs to google slide presentations involves a 10-step process:
- Prepare your presentation
- Create a script for every slide
- Set up mic and practice narration for timing
- Record the voice over in a different software
- Create a unique audio file for every slide
- Upload the audio files to Google Drive
- Insert the audio files one slide at a time
- Set the audio format options for voice over
- Preview the Google Slides with audio
- Share as presentation
1. Prepare your presentation
Before you begin writing the script or recording your voice overs, go over the presentation for 3 simple checks:
- Are the slides arranged in the right order ?
- Are there any missing slides that you had planned on ?
- Is the overall length optimal for your target presentation time?
Else, you will start with recording voice-overs only to realise that your deck is too long for the allotted time, or your story is not in the right order. These often cause a frustrating amount of re-work later. So, make sure to check on these points before you begin.
2. Create a script for every slide
Unlike a live presentation where you would typically have a continuous flow of script, you would need to think of what you want to say specific to each Google Slide and create a script.
Note - There is an option to have an audio play across multiple slides, but it does becomes quite difficult to control which part of the narration plays with which slide, therfore a voice-over is not an an ideal choice. This feature is very useful though when you want to add a general background music to your slides, not narration.
3. Set up mic and practice narration for timing
a. A good quality microphone
It is generally a good idea to use an external microphone for your voice recordings as it helps minimize noise and create good quality voice overs. However, if your laptop or computer has a high quality in-built microphone, you can use that too.
b. Audio permission settings for your microphone
Once you connect your microphone to your laptop or computer, make sure that the microphone is properly identified by your computer. You can check this by going to the Sound options under Settings in Windows and System Preferences in Mac. For Mac, there may be some additional permissions that you may need to provide to your software to access the microphone.
c. A quiet room with minimal noises
This will go a long way in reducing your post processing efforts and improve the quality of your recording. If you are recording this is fairly noisy surroundings, you can always use sound blankets and cushions to create a noise-free zone.
Practicing for narrations - If you are a pro at voice narrations, you can probably skip this step, but if you are a beginner at voice overs, practice the script a couple of times before you start recording. Sometimes, you will realize that your script or your narration style needs some changes.
4. Record voice over narrations in an audio processing software
Since Google Slides does not provide an option for you to record narrations directly, you would need to another voice recording software to do this. You can use Audacity to do this or any other audio recording software you find online.
Audacity is a free tool that provides an extensive set of features when it comes to audio processing. However, it might take a while to get used to the terminology and the interface. Same goes for most audio-processing tools. If you are a beginner, it would be easier to skip the recording part and directly create voice overs in Murf Studio.
5. Create a unique audio file for every slide
It is a good practice to record and save the audio file for every slide separately. Make sure to save the audio files in .mps or .wav formats. Only these two formats are compatible with Google Slides.
Alternatively, you can choose to record the entire script in one go and edit it later, but it would require significant post processing time. Remember to leave pauses for slide changeovers if you record in one go.
This part of the process can get a bit confusing if you have a lot of slides, so you could categorise using a naming terminology so that it is easy to link to a specific slide in a specific presentation.
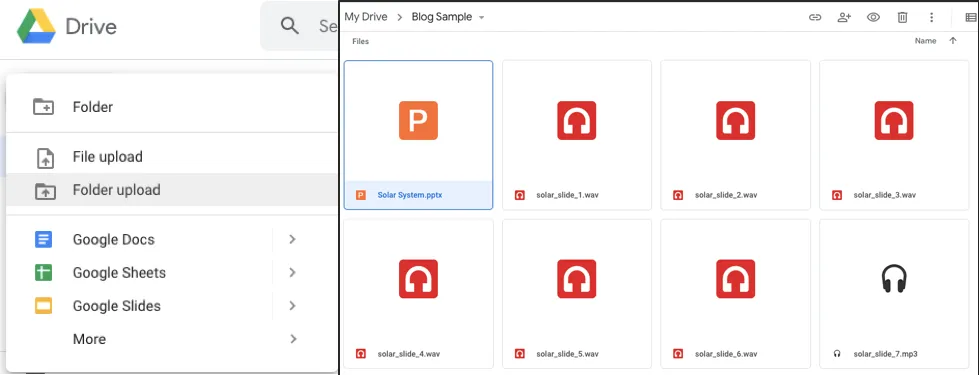
e.g. nameofdeck_slide1_voice.mp3 (another example for my solar system presentation shown below)

6. Upload the audio files to Google Drive
You can use the Folder or File upload option on the left of google drive to create a new folder and upload your files into one folder. It is a good idea to keep the audio files in the same folder as the Google Slide presentation.
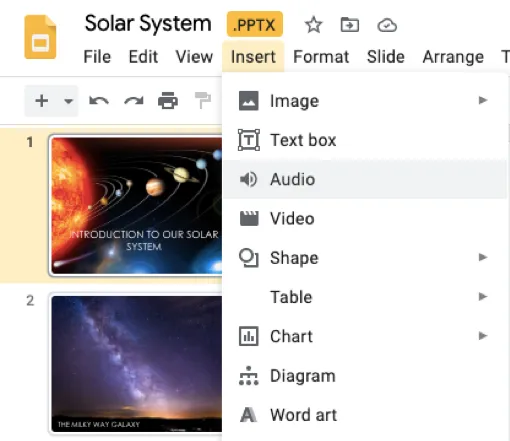
7. Insert the audio files one slide at a time
Now that all the audio files are uploaded on Google Drive, it's time to start inserting each file into the presentation.
Select any one slide and Go to Insert in the main menu and select the Audio option.
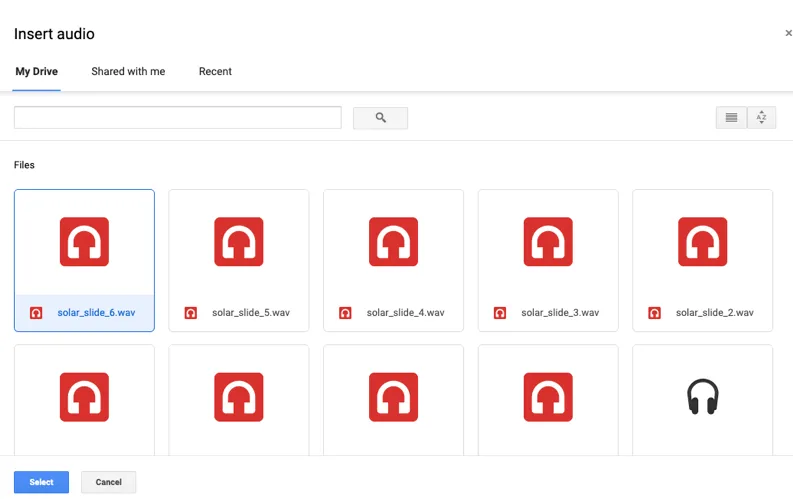
This will open up a pop up box like this where you can see all the audio files.
Select the relevant audio file for the specific Slide to upload here. Do not upload all files at once.
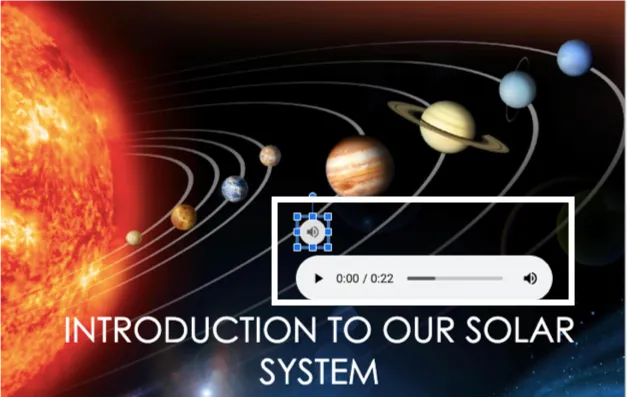
You will see an audio button appear on the slide as shown in the image below. Your audio file is not inserted into this specific slide. You can also select the sound button and move it to any other position on the slide if you like.
8. Set the audio format options for voice over
Once you select the voice icon, you would see a Format Options menu open up on the right. These give you a whole range of choices in terms of playing the narration or other audio file with your presentation.
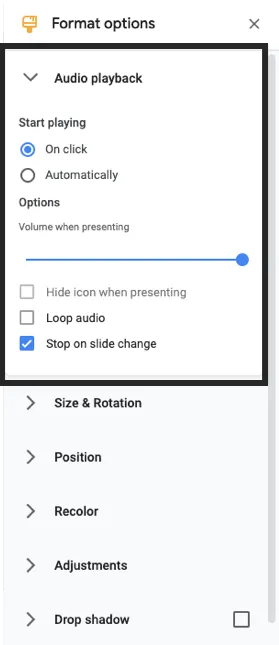
Audio Playback is the most important section here.
Here are some of the key features:
Start Playing options
- On Click -> Plays the audio only when the user clicks on the Sound button
- Automatically -> Plays the audio as soon as the slide appears
Loop Audio - This plays the same audio file on loop. Not useful for narration, but very handy for background music.
Stop on slide change - Audio stops as soon as the slide changes to the next slide, whether or not the whole narration was played.
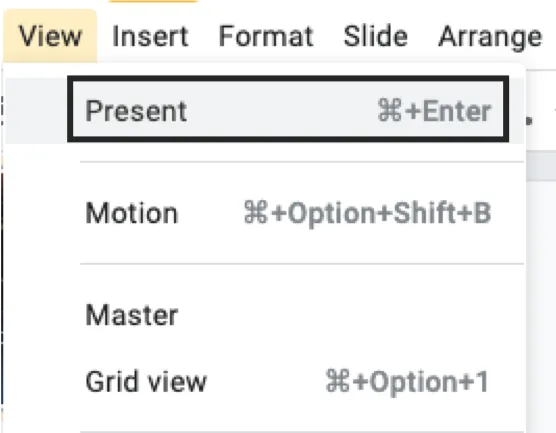
9. Preview the Google Slides with audio voice over
To preview the presentation along with the voice narration, go to View on the main menu and select Present from the options. This will open up the slides in full screen mode and play the narration along with the file.
10. Share as presentation
Google Slides along with narration can be shared via the Share button on top right corner of your presentation.

Unfortunately, the feature to export it as a video is still missing from Google Slides.
Some additional tips for Google Slides:
Adding voice over and background music to the same presentation
If you want to add both voice overs as well as background music, Murf Studio would let you do that very easily. You can adjust timing of voice overs and music as you like, and even choose from many free background music tracks within the tool itself.
You can also do this within Google Slides, but it is difficult to control the timing of the voice over and music. To do this, you can add background music in and add voice over, so that user can play voice over when they want and music keeps playing automatically.
Export your Google Slide presentation as a video
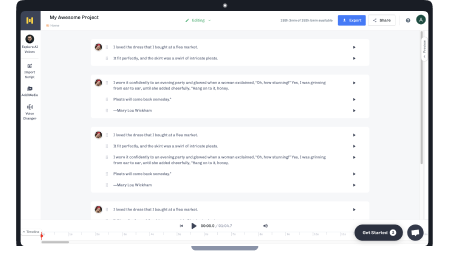
If you would like to share your narrated presentation on YouTube, you would need to export it as a video file. You can use the Murf Studio to also import your slides and audio files and convert it into a high quality video optimised for YouTube.
The timing of each slide and audio can be adjusted manually, so it is quite flexible.
Quick Recap
In this tutorial, we discussed a short and a long approach to add voice overs to Google Slide presentations. Depending on what kind of voice over you are looking for, you can choose to either record it in your own voice or create professional sounding voice overs in the Murf Studio. We have provided here a step-by-step guide to add audio to Google Slide presentations, which can be used to add voice overs as well as background music. We are excited to hear your feedback on our tutorial and know which option you chose to go for.