Voice Changer: Recorded voice to an AI voice

Murf's Voice Changer offers the exciting functionality of swapping a recorded voice with an AI voice. The Murf Studio offers 100+ human-sounding voices across accents, ages and gender, to suit any requirement. All of them are high quality, professional voices built for multimedia content. The Voice Changer is a unique feature with the powerful ability to transform a recording made at home or in an office into studio-quality audio.
A high quality speech audio from Murf can elevate the presentation and the overall finish of a variety of projects, from software demos, tutorials and e-learning modules, to web-based applications which may involve multiple screens with instructions.
E-learning voiceover - A tutorial might involve a presentation with a number of slides, with accompanied voice. The recorded audio may include surrounding noise, or vary in pitch, speed and volume. It may have been addressed to a specific set of people, or recorded in a particular situation, like a live class. A great way to disseminate this resource, already available with audio and video, to a wider audience, is to replace the recorded voice with a clean, uniform, accent neutral AI voice. A further advantage is the ability to edit long pauses, extraneous words and sounds like ‘ah, oh..’ and control the pace of delivery according to the needs of the project.
Software demo voiceover- A software demo, on the other hand, might have multiple screens as well as interactions within one screen or between screens. If including instructions or how-tos, the steps will need to be clearly articulated and demonstrated in order to be useful to those watching it. If the initial demo has been recorded with a voice while also capturing the screen interactions, the Voice Changer at Murf Studio can help smoothen the voice output to match the screens, eliminate unplanned delays and also add any other content that might have been missed out while recording.
If you are concerned about losing the personal touch that comes with the spontaneity of freestyle speech, or you are not sure about how to choose the AI voice for your project, read this blogpost about how to pick the perfect voice.
Murf’s AI voices are natural sounding human voices. In addition to being diverse, all voices can be further refined using features like pitch, emphasis, pauses and even pronunciation hints for proper nouns, technical words or phrases in another language. Converting a recorded voice to an AI voice with Murf has benefits beyond sounding better and removing background noise.
Here’s a step by step guide on using the Voice Changer:
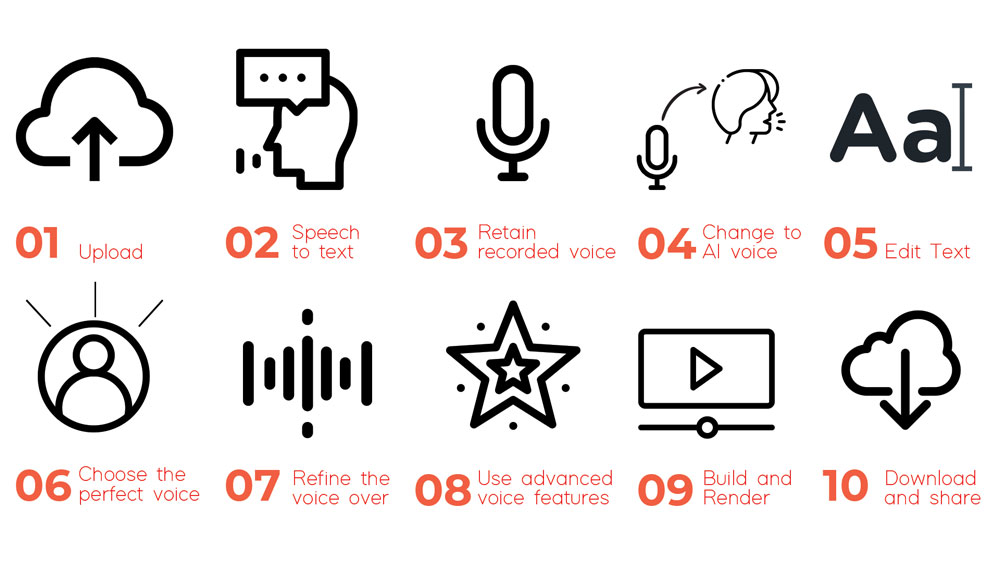
1. Upload recording
In Murf Studio you can upload a video or an audio file, whichever is available. For easier management of the media, a video uploaded with recorded audio will appear as two separate tracks. Do note that the the video format should be a .mp4 file. Audio files should be in .mp3 format.
Upload Audio

Upload Video

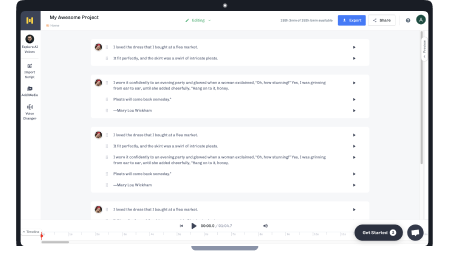
2. Speech to Text
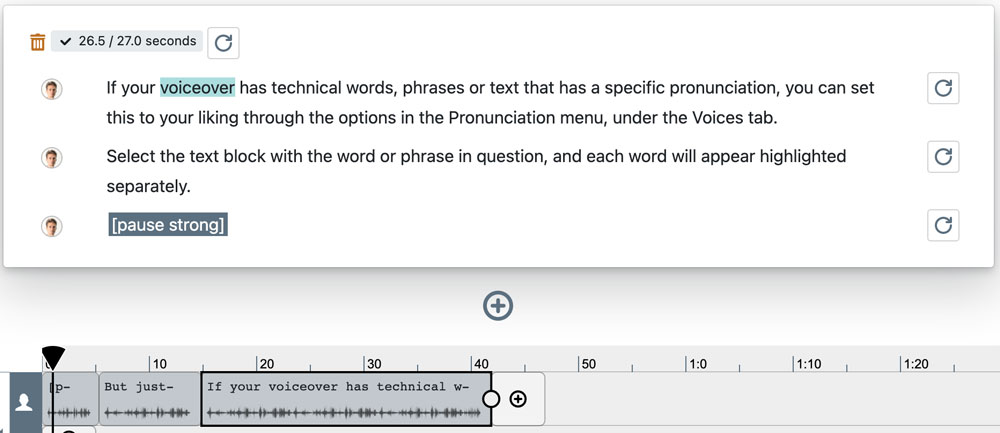
When the audio and video tracks are split, they can be viewed in the tracker at the bottom of the Studio screen, separately. The audio is also converted into text: it will be split into smaller blocks, with pauses called out. The recorded audio of each text block can be played by clicking on the button on the top.
The module-based splitting of text not only makes it easier to edit, it also allows the voice rendering feature to be applied to individual blocks of text, thereby using less rendering time.
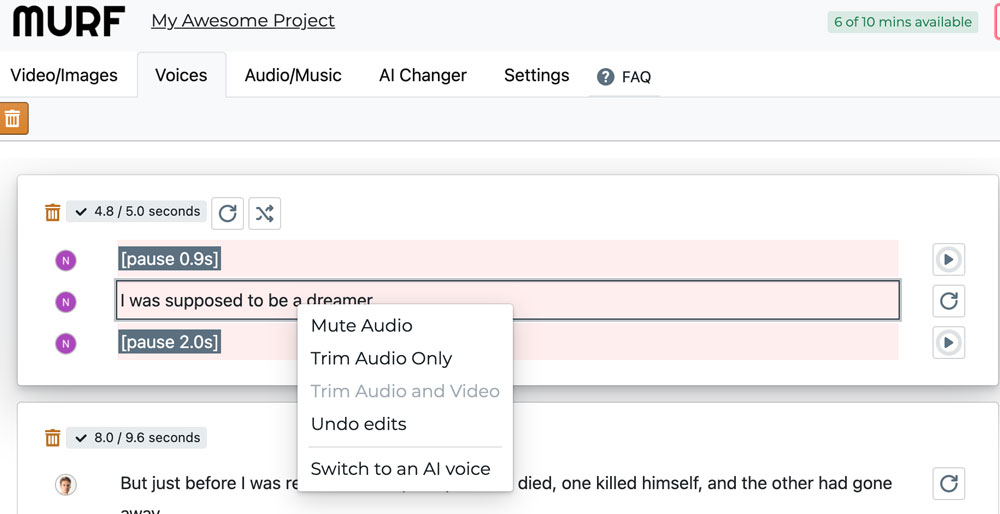
3. Retain recorded voice
When the text is voiced in recorded audio (to know this see the icon to the left of the text - if it matches your login icon on the top right hand corner of the Studio, then it’s the recorded voice), the words can be muted or trimmed, but new words cannot be added. When muting text, the overall timing of the audio remains the same, so a pause of sorts will be heard in place of the muted speech (highlighted in light grey text). With trimming, both the word(s) and the corresponding audio time are removed, so the regenerated recording will have the speech before and after the word or words trimmed out. The overall duration of the recording will also be reduced accordingly.
To view the options available for a recorded voice, select the converted text and right click. Feel free to experiment, replay and redo - the edits can be undone by placing the cursor at the muted or trimmed text, right click and select - undo edits.
Recorded Pauses
The pauses that have been separated from the recorded audio can be removed. To do this, select the pause unit in the text block and the menu under the Voices tab will show a white trash can against an orange background. Click on it to delete the pause.
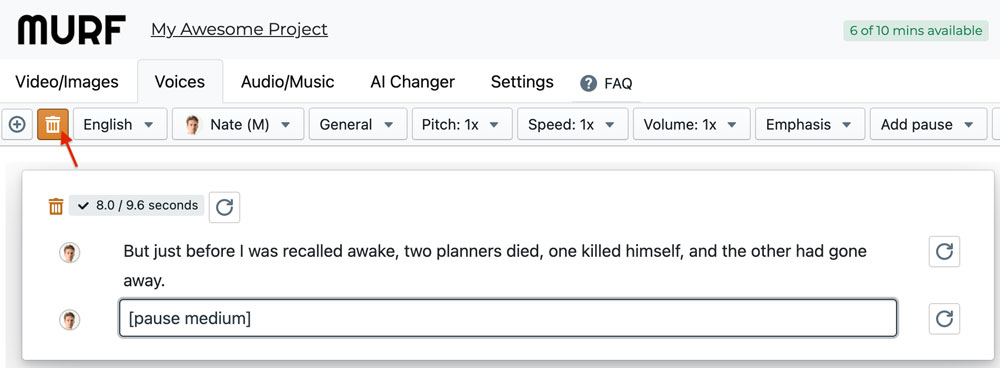
If you would like to shorten or lengthen the pause, here’s a pro tip: add a blank text block after the recorded voice, put your cursor in the box ‘Enter text here to generate voiceover’, and under the Voices tab, select the drop down under Add Pause. You can select a fixed duration, from Extra Weak (250ms) to Extra Strong (1.2s), or you can enter the exact duration you have in mind.
4. Change to AI Voice
If you want to edit the text that has been converted from recorded speech, it has to be changed to an AI voice. To do this, select the block you want to edit, go to the AI Changer tab and select Convert to AI voice. A default AI voice from the Murf Studio will be applied, and the text in the box can now be edited.
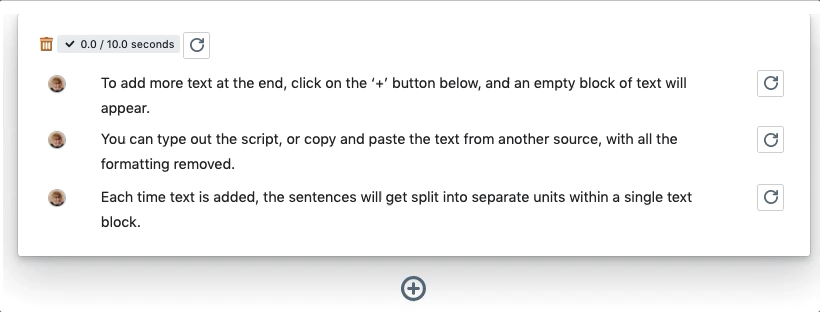
5. Edit script
The text can now be edited as easily as in any word document. To add more text at the end, click on the ‘+’ button below, and an empty block of text will appear. You can type out the script, or copy and paste the text from another source, with all the formatting removed. Each time text is added, the sentences will get split into separate units within a single text block.
To include text in a separate line within a block, select the line before or after which you would like add a new block, and click on the ‘+’ at the left hand corner of the top menu under the Voices tab.
To remove lines within a text block, select the lines you want to delete and click on the orange trash can at the top, between the + add paragraph and the language options.
Murf also has an inbuilt grammar and spell check assistant that is enabled by default, and will underline spelling errors, and highlight grammatical inconsistencies. To disable it, toggle the < > button under the Settings tab.

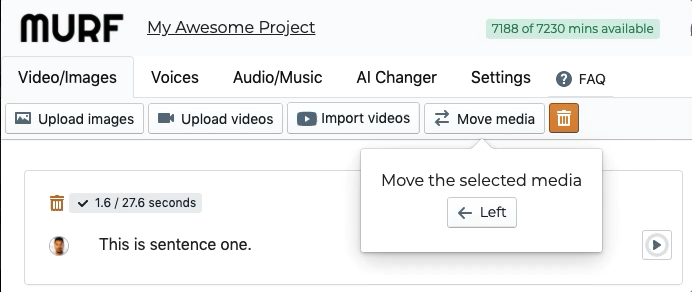
Insider tip: To add a new text in-between existing text blocks, add it in the end, then select the block in the tracker at the bottom of the screen. Right click, then select to move left or right. Use a new text block when you want to apply a feature to it that is different from the other blocks, like another voice, or a separate image / video.
6. Pick the perfect voice
Experiment with as many voices as you like using a single block of text, before applying it to the entire audio. Check out this article on choosing the perfect voiceover.
Pro Tip: If you want to try different voices for different sentences, it is possible! Under the Settings tab, disable the ‘Retain Voice’ button and now each sentence can be changed to a different voice. Once you pick the voice that suits your needs from the Murf Studio, you can enable the ‘Retain voice’ button and now when you select a voice for any of the text, it will be applied to all the text in that block.

7. Refine the voiceover
At this point you might have changed all the recorded voice into an AI voice, or only a part of it. You might have chosen only one voice for the entire video, or a mix of voices. Murf offers multiple features to help refine the tone and the voice presentation as a whole. Select the text block for which you want to edit the voiceover, and under the Voices tab, work with the pitch, speed and pause buttons. Remember, if the ‘Retain Voice’ button under Settings is enabled, the changes you choose will apply to all the lines in the text block. To apply to one sentence at a time, disable this button.
The following features are available under the Voices tab:
Pitch: change the pitch of speech from half an octave below to half an octave above. Want to go back to how it all was? Click Reset.
Speed: Options are available in multiples of 0.1, from zero to twice the speed. Experiment with a single unit of text within a block to save on rendering time.
Pause: Click on the drop down under Add Pause. You can select a fixed duration, from Extra Weak (250ms) to Extra Strong (1.2s), or you can enter the exact duration you have in mind.
8. Advanced Voice Features
Murf’s second-generation AI voice model offers superior fidelity and precision, producing voiceovers that sound indistinguishable from human speech. Built with cutting-edge generative neural architecture, the model has been trained using over 70,000 hours of ethically sourced speech data, encompassing diverse demographics and emotional ranges. This results in voices that capture every nuance of inflection and rhythm, making your content sound strikingly natural.
High-Fidelity Sound and Pronunciation
Operating at a 44.1 kHz sampling rate, the Gen 2 model captures the full range of human speech, ensuring even subtle sounds like the sibilance of 's' and 'f' are reproduced with high clarity. This advanced fidelity enhances the voice's realism, making it feel more human than machine.
The model also excels in pronunciation accuracy, thanks to a deep linguistic layer. It accurately replicates accents in multiple languages, ensuring clarity in even the most technical or specialized language. Rigorous testing showed a 98.8% word-level pronunciation accuracy in the English catalog, ensuring your content is delivered with precision.
Functionalities in the Voices Tab
Depending on the voice selected, you’ll unlock additional functionalities, available under the Voices tab, such as volume control, emphasis, and pronunciation adjustments.
- Volume: Adjust the voice volume from mute (0) to 1.5 times the default, allowing for a balanced audio experience across your project.
- Emphasis: This feature lets you apply upward or downward intonation to specific words or phrases. It adds dynamic realism to your voiceovers, breaking the monotony of continuous speech and mimicking natural human dialogue. By emphasizing key words, you can guide your audience’s attention and create more engaging content.
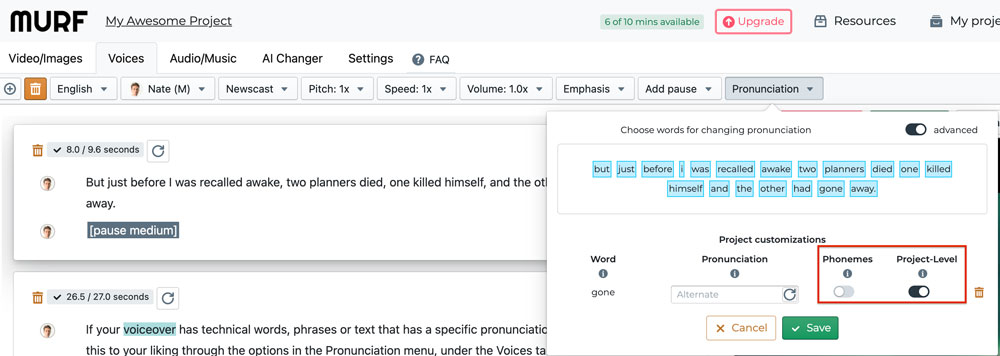
- Pronunciation Customization: For technical or specialized content, the Pronunciation tool lets you modify the pronunciation of individual words. By selecting a word, you can manually adjust its sound or use the Phonemes feature for more complex changes. Following the IPA standard, this allows for precise control over how words are pronounced throughout your project.
Finishing touches
For consistency, you can apply these pronunciation changes across the entire project using the Project-level Pronunciation feature, or limit them to a single instance.
Customization through Voice Styles
Murf’s Gen 2 model offers a wide variety of voice styles, allowing you to customize pitch, pace, and emotional depth to match the tone of your content. Whether it’s a persuasive presentation, an audiobook, or an e-learning module, you’ll find a style that suits your needs perfectly.
Customization through Variability and Say It My Way
The Variability feature provides multiple renditions of any given line, allowing you to choose the one that best fits your vision. This dynamic functionality ensures that your voiceover reflects the natural variations of human speech.
For ultimate control, Say It My Way allows you to record a line yourself, and the model will mimic your delivery, replicating your intonation, pitch, and pace.
Word-Level Emphasis
For creators who need more granular control, the Word-Level Emphasis feature allows you to emphasize individual words. This is ideal for highlighting key information, adding urgency, or delivering irony.
With these features, Murf’s Gen2 AI voice model empowers you to create professional-quality, human-like voiceovers with a level of customization and control that ensures every voiceover perfectly aligns with your vision.
The time length of the audio and video blocks can also be adjusted. Increasing the audio time will automatically include pauses, and the updated time of the block can be seen at the top < / >. If you trim the text block in the tracker to a point when its duration is lesser than the time taken for the audio, you will see an alert message at the top of the respective text block. Make sure that the time is adequate for all the speech in the text block to be vocalised.
Error warning if length of voice block < voiceover size

Adequate length of voice block
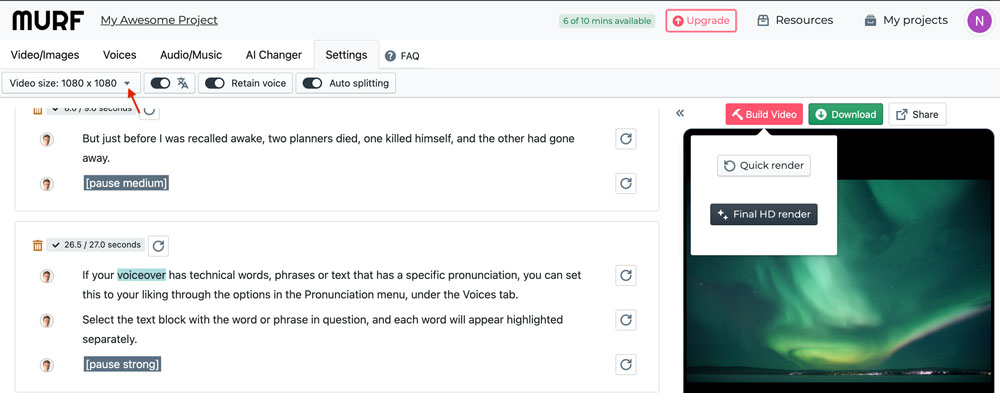
9. Build and render
At this point, if you have finished putting together the audio track or the audio-video you had in mind, it’s time to get a preview. Click on the Build Video / Build Audio button (with the pickaxe to its left) above the picture screen on the right hand side of your project dashboard. Use the Quick Render option for a cursory check of the output, at lower quality. The final HD render will take more time, and provides a high quality, downloadable video or audio render.
The final render size can also be customised by platform.
10. Download and share
Once the final HD render is complete the Download and Share buttons will appear next to the Render button. To download, you need a paid plan. You can share the rendered video through murf with a free account, though, and Murf offers public sharing, restricted sharing and secure sharing as well.
To summarise, Murf’s Voice Changer can be the difference between a home recording and a professional sounding project.

.webp)


![Best Voice Changer for PS4/PS5 [How-To Guide Included]](https://cdn.prod.website-files.com/675151245f2993547dbd5046/697b407b30095558595ffa64_67c1c1c85e18d90823df0dab_Best%2520Voice%2520Changer%2520for%2520PS4PS5%2520Hero.webp)


